SPMRoot
The SPMRoot is the next generation of acquisition system for the Pelletron-Linac Laboratory of the Institute of Physics of the University of São Paulo, Brazil.This document is divided in the following sections:
Introduction
The SPMRoot is the next generation of acquisition system for the Pelletron-Linac Laboratory of the Institute of Physics of the University of São Paulo, Brazil.The current features of this software are:
- ROOT based software bringing all the power of the ROOT system to the software
- User friendly graphical interface permits easy control of the acquisition system
- Histograms are defined using c++ code allowing unlimited possibilities of histogramming and data visualization
- Level 2 trigger. This is a software trigger written in c++ by the user that allows the user to have unlimited possibilities to decide if one event is to be saved or not.
- Interface with multiple CAMAC crates
- Event Handler language compatible for event readout from CAMAC crates
- Data is saved in the same format as the old SPM acquisition system.
Starting SPMRoot
SPMRoot is the basic CAMAC data acquisition system interface in the ROOT framework. To start an acquisition system, type in the Linux prompt:> spmroot [options] [/dev/...]
To get a list of options available in the command line, type:
> spmroot -help
The options available are:
- -h or -help
- Displays the help message
- - d or -debug
- Start the program in debug mode. This mode is slower than the normal acquisition mode and prints event information in the screen for each event taken.
- -c or -cint
- Enter the program with the ROOTCint prompt available. In this mode, the ROOT command prompt is available and all the ROOT capabilities can be used
- [/dev/...]
- sets the CAMAC device to be used for acquisition (default = /dev/c111a0). It can also be a .FIL file. In this case spmroot will simulate the acquisition from the .FIL file. This simulation do not go through the CAMAC driver.
Using the program
When the SPMRoot program starts the following graphical interface will be displayed.
Acquisition status panel
The acquisition system GUI has a very large status panel that contains the following information:- Run no. - The current run number
- No. Events - Number of events taken in the current run
- Start - Start time of the current run
- Elapsed - Elapsed time of the current run in seconds
- Dead (%) - Fraction of the timing used for histogram, L2 trigger and event saving
- Ev. rate (1/s) - Events taken per second
- Saved - Number of events saved on file
- Lost - Number of event lost in CAMAC
- EVO File - EVO file being used in the acquisition system
- Hist Lib - Histogram library being used for QA
- Recording mode - Where the events are being saved
- L2 trigger - Software trigger being used to decide if the event should be saved/histogrammed or not
- BUTTON WITH STATUS - Status of the acquisition
- STOPPED - Acquisition is stopped
- PAUSED - Acquisition is paused
- RUNNING - Acquisition is running
- The LOG window will display all the messages in the system. These messages are also saved in the SPMRoot.log file for archiving purposes.
Button bar
There are also 3 buttons above the status panel that can be used to START (RUN), STOP and Pause the acquisition system. These buttons are enabled only if there is an EVO file loaded and depending on the status of the acquisition system.Main Menu
The Main menu of the program has the following structure:- File - General file related options
- Load EVO - Loads an EVO file
- Load Histogram definitions - Load a histogram library for display of the data
- Save Histograms - Save all the histograms to a file
- Auto Save Histograms - If checked, automatically saves the histograms in the end of each run
- Set Fil Mode - Set the way data is saved
- Disabled - No RAW data is saved
- Disk - RAW data is saved to disk
- FIL split mode (DISK only) - Split the .FIL files when it reaches a given limit. Works only if the Fil Mode is set to DISK. The available limits are
- None - No split
- 100 MB
- 200 MB
- 400 MB
- Level 2 trigger - Load a software trigger to flag the events that need to be saved/histogrammed
- Load - Load Level 2 library from disk and enable Level 2 trigged
- Unload - Unload Level 2 library from memory and disable Level 2 trigger
- Exit - End program
- Acquisition - Manage acquisition system
- Start RUN - Start a new run
- Stop RUN - Stop the current run
- Pause RUN - Pause the current run Note: These options are available only if an EVO file is loaded.
- Tools - Histogram and scalers management
- Zero Histogram - Zero one histogram that can be selected by its name
- Zero All Histograms - Zero all histograms in the memory
- Read Scalers - Read scalers values
- Zero Scalers - Zero all scalers values
- Set Scaler Crate - Set the CAMAC crate where the scalers are connected
- Set Number of Scalers - Set number of scalers modules in the system
- Configure Scalers - Configures the position of the scalers modules in the CAMAC crate
- Set CAMAC Buffer Size - Set the size of the CAMAC buffer in number of words
- Set max number of parameters - Set the maximum number of different parameters one event can have. This is used to save acquisition time for very small setups
- Set current configuration as default - If clicked, it will save the current configuration as default for the next time you start SPMRoot
- Display
- new TCanvas - Create a new TCanvas for histogram display
- new TBrowser - Create a new TBrowser for memory navigation
- PelTools menu - Open the PelTools menu bar
- Help
- Help - Open this web page
- About - Information about current version of the program
Loading an .evo file
To load an EVO or EVP file, click on File -> Load EVO in the menu bar. This will show the following window: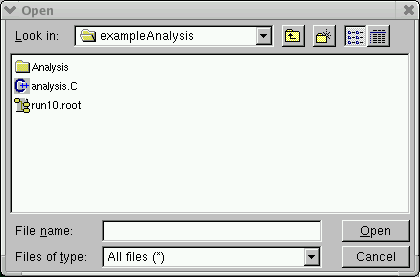
Loading histogram definitions
To load the histogram definitions, click on File -> Load histogram definitions in the menu bar. This will show the following window:
Click here for a detailed description on how to set up histograms.
Data saving configuration
There are many options of data saving:- You can save the histograms anytime by clicking on File -> Save Histograms in the main menu. It will ask for the name of the file where the histograms should be saved.
- You can automatically save all the histograms when the RUN is stopped by checking the File -> Auto save histograms in the main menu. The file name will have the run number on it.
- You can save the RAW data in the FIL format on disk. To do so, select one of the following options in the File -> Set FIL mode in the main menu
- DISABLED - No raw data is saved
- DISK - Data is saved on disk
- If you choose DISK, you also have the option to split the .FIL files when it reaches a given limit. You can define this limit by selecting a value in the menu File -> FIL split mode (DISK only)
Level-2 trigger
The Level 2 trigger is a powerful feature of this new acquisition system. This is a software trigger that will run every event and decide if this event should be saved or not. This allow, for instance, the user to pre-analyze the data before saving it. One example of this trigger would be to check for a particular coincidence between 2 detectors in order to save the event. It will make the file size smaller and faster to process.To load the Level 2 trigger, click on File -> Level 2 -> Load in the menu bar. This will show the following window:
To unload the Level 2 trigger, click on File -> Level 2 -> Unload. If there is no Level 2 trigger loaded in the program the acquisition system will save and histogram all the events taken.
Click here for a detailed description of the Level 2 trigger setup.
Configuring the CAMAC
There are few parameters in the CAMAC system that may be configured by the user in order to enhance the performance of the acquisition system. These options are under the menu tools in the main menu bar. They are:Scalers
This acquisition system supports multiple scalers (up to 10 scaler modules). All of those scalers should be connected to the same CAMAC crate.By default, the program starts with 1 scaler configured in the CAMAC crate number 0, slot number 1.
The scaler configuration options are:
- Set scaler crate - This option lets you specify the crate where the scalers are connected. When clicked it will open the following window:

- Set Number of Scalers - This options let you specify the number of scalers installed in the system. When clicked it will open the following window:
where you can set the number of scaler modules.
- Configure Scalers - This option let you specify the slot where each scaler is connected. When clicked, it will open the following window:
This window will have as many lines as the number of scalers configured. Enter the slot number for each one of the scalers installed in the crate.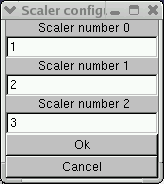
- Zero scalers - Zero the scaler memory for all the scalers configured in the system.
- Read scalers - Read the contents of all the scalers configured in the system.
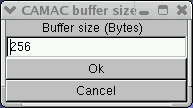
CAMAC buffer size
The option Set CAMAC buffer size will let you configure the size of the CAMAC buffer in the computer. The amount of memory allocated for the CAMAC driver is always constant. This memory is divided into buffers and only when one of these buffers is full it will be transferred to the acquisition program. So, if the event size is small and the event rate is low, a large buffer size will take longer to be transferred to the computer. Small buffer sizes with high event rate will make the acquisition program spend more CPU time to process a lot of small buffers that are filled very fast.When clicked, the following window will open:
Maximum number of parameters
When the option Set maximum number of parameters is clicked it will open the following window:
Display and Monitoring
The display of the histograms in the system and also some analysis of the data are accessible from the Display menu in the main menu bar. The Display menu has the following items on it:- new TCanvas - Creates a new TCanvas for histogram display
- new TBrowser - Creates a new TBrowser for memory navigation
- PelTools menu - Opens the PelTools menu bar
The use of TCanvas
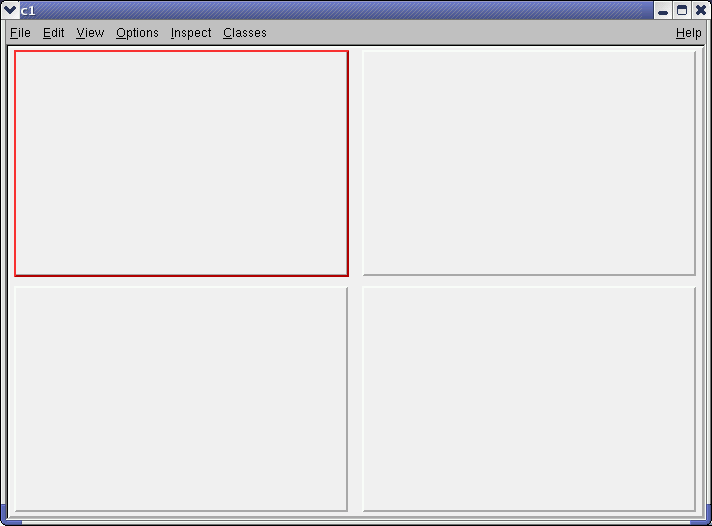
The TCanvas is a basic object that is used to display histograms in the screen. If the new TCanvas is clicked it will open a basic canvas that looks like: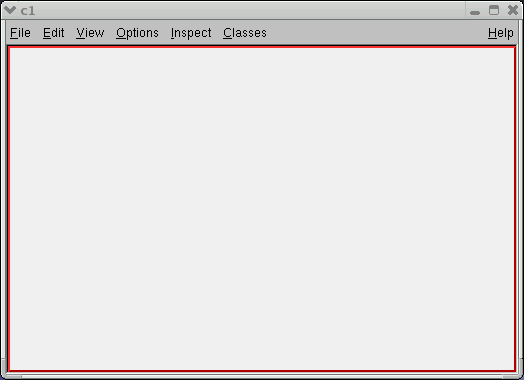
The canvas menu has many options. Some interesting options are:
- File
- Save as - lets you to save the canvas in one of the following format:
+ ps, eps, gif, C and root - Print - prints the canvas
- Save as - lets you to save the canvas in one of the following format:
- Edit
- Editor - opens a graphical editor where you can write text, draw lines, arrows, etc in the canvas
- Clear PAD and Canvas - erases the current pad or the entire canvas

- SetLogx, SetLogy and SetLogz - enables/disables the logarithm scale in a particular axis.
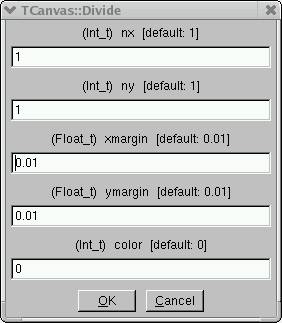
- Divide - this divides the current PAD into many others so you can display many histograms in a single canvas. When this option is clicked it will open the following window:
The TBrowser
When clicked, this option will open a browser windows that let you navigate through the directories and the program memory to access histograms and other ROOT objects. The browser window will look like: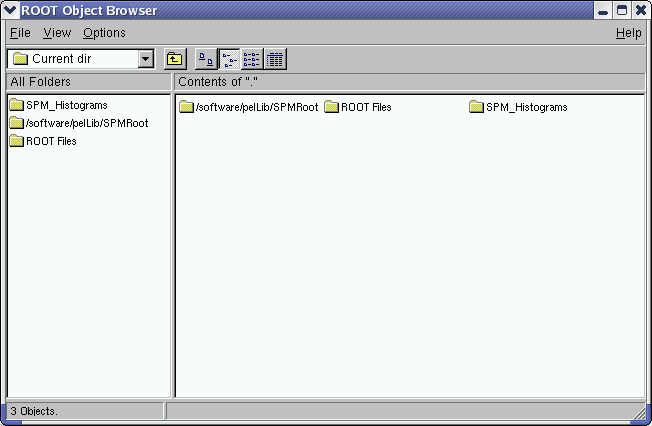
- SPM_Histograms - This directory contains the histograms that were defined by the user and are filled during RUN time.
- /software/... - This is the current directory where you started the program. This gives you access to the files in the disk
- ROOT Files - This is where the root files opened in the program are organized. You can navigate in this directory to access information saved on saved root files.
Histogram Manipulation
If you click on a directory that has histograms on it you will have a windows similar to the following: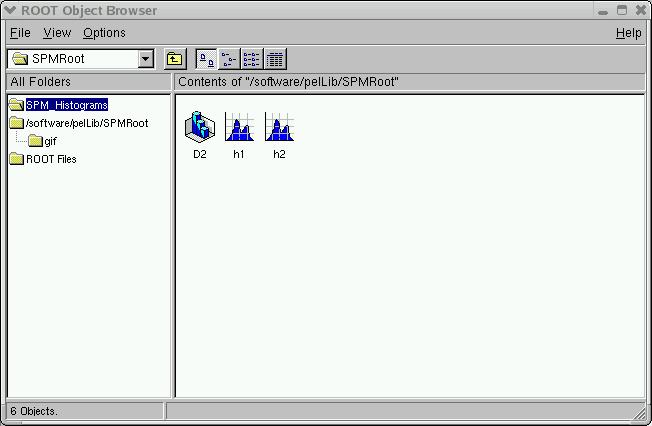
D2 is a 2 dimensional histogram in this example. When double clicked it will be displayed in the current PAD. A 2D histogram looks like:


One extra option in the menu is the Zero histogram 1D (2D) that lets you to zero the particular histogram.
Some useful operations with histograms:
- Zeroing single histogram
You can go to the acquisition system main menu and click on
Tools -> Zero Histogram -> 1D (or 2D) Histo -> Histogram name
OR
Right click on the histogram icon in the TBrowser window and select Zero Histogram 1D (or 2d)
- Change display attributes
- Right click on the histogram icon in the TBrowser window and select SetLineAttributes or SetFilAttributes or SetMarkerAttributes to change the way histograms are displayed.
- Change the way histograms are drawn
- Right click on the histogram icon in the TBrowser window and select DrawPannel
- How to draw one histogram on the top of the other
- Double click the first histogram so it will be displayed in the current pad.
- Right click the other histogram and select DrawPannel
- Click on same picture, Draw and Close buttons.
- Repeat for the next histogram you want to put on the top of the last ones.
- How to update the histogram displayed on a PAD
- Just left click on the pad the histogram is displayed. All the histograms on that pad will be updated.
